Setup
Setting Options
When the application starts the first thing to do is set the options. Options are persistent and will be remembered every time the application launches. Below is a list of options and what they do.
Set Game Directory
Setting the game directory will allow the application to use the “Auto Export To Game Directory” and “Auto Load Equipment And Tech” options as well as allows launching the map editor through the scenario tab.
Auto Export To Game Directory
Setting this option will automatically export files to the appropriate folders in the game directory. For this option to work you must set the “Scenario Name” text field to be what you want to name the file exported.
Auto Load Equipment And Tech
Setting this option will load in the DEFAULT.UNIT and the DEFAULT.TTRX as the application starts. The application looks for these files in the game directory /Maps/DATA folder. Once the program opens the Technology tab and Orbats tab will be populated with entries.
Scenario
Creating SCENARIO file from scratch
Creating a SCENARIO file is completed in 5 steps using the ScenarioCreator tool.
Step 1 - Naming your scenario

- Name your scenario
- Type a name into the “Scenario Name” text box. It can be anything you like.
- Name your cache file
- Select a name for the cache file, it should be unique. It is recommended to use the same name as the scenario name.
- Type your cache file name into the “Cache Name” text box or check the “Same As Scenario Name” checkbox, whichever you prefer.
- (Optional) Give it a Scenario ID
- Scenario ID can be anything you like, it is used mainly for Steam achievements and can be left blank.
- Type your Scenario ID into the “Scenario ID” textbox or leave it empty.
Step 2 - Setting data files (First Set)

- For most purposed the data files in step 2 can be set as default, if you are using custom data files (.UNIT, .PPLX, .TTRX, .TERX, .NEWSITEMS, .INI) proceed here.
- ====== To set as default ======
- Check the “Default All” checkbox to use all default files in this section.
- Each file name and path will be set automatically, it will use the default data files.
- ====== To set custom files ======
- For each of the text boxes in this section right-click and select the “Path” option.
- Each row in the table represents a single file, enter in the file name, then the relative path from the game directory. The files in this section are not usually localized and the checkbox should be unchecked.
- ====== To set as default ======

Step 3 - Setting data files (Second Set)


- For each of the text boxes in this section right-click and select the “Path” option.
- Each row in the table represents a single file, enter in the file name, then the relative path from the game directory. If the file is localized make sure that the checkbox under the “Localized” column in checked.


Step 4 - Setting scenario options

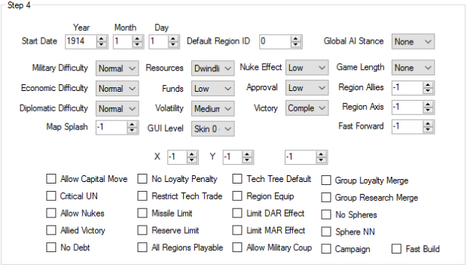
- Select all options that you would like to be applied to the scenario. These options mirror the options that can be set at the Lobby level of the game.
- For more info see Gamepedia on scenario files.
(Note: A negative value in a numeric field means the entry will be left blank on export and the Game Engine will decide the value.)
Step 5 - Select Map Files


- The ScenarioCreator supports creating custom maps through the Map Editor as well as specifying existing map files.
- To create a custom map
- Select the base starting map
- To create a custom map
- (options are “Blank”, “1936”, “Cold War”, “2020”)
- Click the “Create And Launch Map Editor” button to save the .SCENARIO file and launch the Map Editor.
- To use an existing map
- Type the name of the .MAPX file into the “MAPX” textbox
- Type the name of the .OOF file into the “OOF” textbox
- Click the “Create” button to save the .SCENARIO file.
- To use an existing map
Editing an existing SCENARIO
Step 1 - Load .SCENARIO File


- Click the “File” menu object then mouse over the “Load” option and click on the “SCENARIO” option.
- In the resulting window select the .SCENARIO file you would like to edit.
- The Scenario tab will be populated with all the settings included in the .SCENARIO.
Step 2 - Change Values
- Change all values that you would like to be in the new scenario.
- The sections of this tab are covered here.
Step 3 - Export .SCENARIO
- Click the “File” menu object then mouse over the “Export” option and click on the “SCENARIO” option.
- In the resulting window select the directory and file name you would like to save. (If you have the “Auto Export To Game Directory” option set it will be saved in \Scenario\Custom)
CVP
Creating a CVP File From Scratch
Step 1 - Create custom regions


- (Required) Enter the name of the region you would like to create in the “Region Name” text box.
- (Required) Enter the prefix to be used on colonies in the “Prefix” text box.
- (Optional) Fill in the rest of the regional options as you would like them.
- More information on regional options can be found on Gamepedia here.
- Click the “Create Custom” button to add the new custom region.
- Repeat this step for each custom region you would like to be in the .CVP file.
Step 2 - Export .CVP File


- Click the “File” menu object then mouse over the “Export” option and click on the “CVP” option.
- In the resulting window select the directory and file name you would like to save.
- (If you have the “Auto Export To Game Directory” option set it will be saved in \Maps)
Editing an existing CVP
Step 1 - Load .CVP File

- Click the “File” menu object then mouse over the “Load” option and click on the “CVP” option.
- In the resulting window select the .CVP file you would like to edit.
- The Regions tab will be populated with all the regions included in the .CVP.
Step 2 - Editing Regions

- Find the region you would like to edit and click on the “Edit” button in the region’s row.
- The relevant information will be automatically filled in and the “Create Custom” button will be renamed to “Save Changes”
- (Note: Having a region in this state during export will skip the region from being exported.)
- Change any regional options you would like then click the “Save Changes” button to return the region to the .CVP.
Step 3 - Export .CVP File


- Click the “File” menu object then mouse over the “Export” option and click on the “CVP” option.
- In the resulting window select the directory and file name you would like to save.
- (If you have the “Auto Export To Game Directory” option set it will be saved in \Maps)
Merging from existing CVP
Step 1 - Load .CVP using Merge from CVP


- Click the “Merge From CVP” button located on the top-right of the “Regions” tab.


- Once the “Add Regions” window appears click the “Open CVP” button.
- In the resulting window select the .CVP file you would like to add regions from.
- Once the list of regions has loaded you can click the check box under the “Add” column for each region you would like to add.
- Click the “Add Regions” button to add all selected regions to the .CVP
- Once finished close the “Add Regions” window.
REGIONINCL
Creation REGIONINCL File From Scratch
Step 1 - Add regions to CVP list
- The REGIONINCL cannot be created without regions in the CVP list.
- Create custom CVP
- Use existing CVP
Step 2 - Use the “Region Include” tab


- For each region you would like to be in the REGIONINCL find the row entry under the “All Regions” list and click the “Add” button.
Step 3 - Export the .REGIONINCL File


- Click the “File” menu object then mouse over the “Export” option and click on the “REGIONINCL” option.
- In the resulting window select the directory and file name you would like to save.
- (If you have the “Auto Export To Game Directory” option set it will be saved in \Maps)
Editing an existing REGIONINCL
Step 1 - Load .REGIONINCL File


- Click the “File” menu object then mouse over the “Load” option and click on the “CVP” option.
- In the resulting window select the .CVP file you would like to edit.
- The Regions tab will be populated with all the regions included in the .CVP.
Step 2 - Edit the .REGIONINCL file


- Click the “File” menu object then mouse over the “Export” option and click on the “REGIONINCL” option.
- In the resulting window select the directory and file name you would like to save.
- (If you have the “Auto Export To Game Directory” option set it will be saved in \Maps)
OOB
Creating OOB File From Scratch
Step 1 - Add regions to CVP list
- The OOB cannot be created without regions in the CVP list.
- Create custom CVP
- Use existing CVP
Step 2 - Load .UNIT file
- The orbat cannot be built without a .UNIT file loaded.
- Loading .UNIT file
Step 3 - Add Units To The .oob


- Select the region for which you would like to add units to the orbat from the drop down list. (Note: You can also type the region ID into the text box to the left of the drop down.)
- Once the region is selected you can